Sunday, April 2, 2017

Call the Midwife, Quilter Style

Fans of the PBS series Call the Midwife will recognize these scenes and faces:


In the TV show, a group of plucky midwives (have you noticed how many heroines in British dramas are plucky??), some nuns and some lay nurses, minister to the women of East London in the late 1950s and early 1960s, a time of great upheaval and change both in medicine and in society as a whole. It's awesome TV and I highly recommend it to everyone.

Maybe my enjoyment of the series explains why I woke up this morning thinking, "You know, I'm kind of like a midwife, quilter style."

Most of my time these days is spent assisting other quilt designers with their projects. I've been having a ton of fun helping other quilters and companies with pattern writing, technical editing, sample sewing, and more. New collaborations with C&T Publishing, Pokey Bolton, and Kate Spain, LLC are keeping me busy right now, and I love every minute of it.

But, like a midwife, once the baby comes, it's...not mine. I'm thrilled for the designers whose work is born (Gerri Robinson, I'm looking at you and your new book, Casual Classic Quilts!), but I want and need to create, too. After all, even midwives get to have babies of their own at some point!

So this is my renewed commitment to myself to make time every day to create. When I do, I am so much happier! I have a quilt pattern for Timeless Treasures coming soon to their "free projects" page (watch for it here). It's called Born to Fly and it features their Fly Away fabric collection. I had the best time designing it and writing the pattern, and even spent hours teaching myself to create diagrams in Word. It's projects like this that remind me why I'm working in the quilting field to start with. I love to design and make quilts - duh!

Born to Fly sneak peek


If you need a quilting midwife, please contact me. There's nothing I'd like better than to help you birth your next project. And I'll also be dedicating some time to my own babies. And showing off their pictures here!

Monday, February 27, 2017

Time Flies

Wow, has it really been over 3 months since my last confession blog? A lot has happened in that time, but the bottom line is I'm still working on getting my quilt business off the ground. I've done freelance writing and editing work for lots of great people and companies in the last 3 months, including some projects that make me really proud. Check out:

I also covered a maternity leave for the online editor for Fons & Porter and McCall's Quilting brands from the beginning of November to the middle of February. So...I've been keeping busy, and I feel very blessed to have the opportunity to work with all these amazingly talented people. And there are more collaborations in the pipeline - very exciting!

On the home front, I've been working on the 2 twin size Log Cabin quilts for my guest room, and hand quilting a wall hanging for a friend. I've also been doing something a little different when I need to make a test block or two for any project I'm patterning or editing. This year, whenever that need arises, I'm using fabrics from a single Moda fat quarter pack (Madame Rouge by French General). I figure at the end of 2017, I'll have enough blocks for a unique sampler quilt, and only have to work out how to assemble them into something pleasing. Can't wait to see how that all comes together...

Watch for more blog posts in the near future. I'm going to be quilting up a storm!


Monday, November 14, 2016

Quiltmaker's 100 Block Blog Tour

Volume 14 of Quiltmaker's 100 Blocks magazine is now available and I have a block inside! I am thrilled to be in the company of so many awesome quilt designers, including Bonnie Hunter, Carolyn McCormick, Nancy Mahoney, Sarah Maxwell, and more. Here's the pretty cover:

Order a magazine online


My block is called Chicken Foot, and it's not an original, unlike the other 99 blocks in the magazine. It's a traditional block, but one that has fallen so far under the radar that it's nearly impossible to find a reference to it or pattern for it anywhere. It was also my Mom's absolute favorite quilt block of all time. She loved to piece it by hand and made several quilts using it, as well as many "orphan" blocks.

For the magazine, I resized the block to 12" finished size and made up a sample using 1930s repro prints. I loved the opportunity to showcase these cute novelty fabrics in such a sophisticated setting. Take a look:


I recently finished a quilt featuring some of Mom's Chicken Foot blocks for my niece's wedding. I made appliqued blocks for the alternate spaces. The name of this quilt is From This Day Forward and the pattern will be available in an issue of McCall's Quilting magazine sometime in 2017:


But Chicken Foot blocks don't just have to be pastel! How about glorious red, white, and blue?


As you can see, when you do a bit of planned fabric placement, instead of a completely scrappy look, you can get all kinds of secondary designs going, which I love. Another great feature of this block is the large open center, perfect for showcasing a bit of applique, embroidery, or fancy quilting.

The Chicken Foot block is a bit challenging to make, but its versatility, uniqueness, and striking geometric qualities make it well worth the effort. I hope you'll give it a try and send me a photo of your version!

Now for a magazine giveaway. Leave a comment below with an idea for how you'd make this block by midnight, November 18, and you'll get a chance to win a copy of Volume 14 of Quiltmaker's 100 Blocks. Good luck, everyone!


Monday, November 7, 2016

Advent Calendar Wall Hanging Ready to Quilt

I've been having quilty adventures left and right the last few weeks, starting back to work with McCall's Quilting and Fons & Porter to cover a maternity leave, finding a super-nice group of women to quilt with on Wednesday evenings (shout out to The Bee!), making Christmas crafts with my sister and cousins, and more.

But the main thing on my menu has been the Advent Calendar wall hanging, which got layered for quilting just yesterday!


I'm overall very pleased with it. Ideas for machine quilting are starting to solidify and I hope to get it on my worktable today or tomorrow. 

The little pockets for treats came out well. I made each pocket just a tiny bit wider than the patch behind it so it would be a bit gathered, allowing bigger treats without distorting the whole wall hanging. Bigger treats = happy kids!


One small problem came up right at the end. I must have been more tired than I knew on the evening when I fused the tree shapes etc. to the finished top, because the trunk for that tree on the right was WAY off center, too far to the left. Solution: Add a Christmas gift to the design and obscure the offending portion of the trunk. I think it works!


That photo was before the shapes were stitched down. The bow looks more like a bow now that it's stitched.

So, that's what's on my to-do list this week. How about you?  :)

Wednesday, October 26, 2016

Advent Calendar Quilt Beginnings

Yesterday I started working out the details of my new Advent calendar quilt. First problem - how to get the numbers onto each 3" square window in the quilt. I knew I wanted to make circles with numbers on them, in hopes of stitching them onto the windows with decorative machine stitches so they look a little like wreaths. But I hadn't really thought out how to get the numbers onto the fabric circles.

Time is of the essence, of course, so first I considered fabric marker. I tried a variety of pens out on a variety of fabrics, but didn't like anything I came up with. It just looked - cheap.

Next, I considered applique. But when I realized the numbers would need to be about 3/4" (tiny!) and that I'd need to do 41 digits total, I gave that idea up. Even with fusible applique, that seemed like a big task when you consider the edge stitching required to secure everything.

Finally, I thought about embroidery. While I don't do it often, I do enjoy the process. And it would give the project the handmade look I'm going for. So, here are some of the numbers embroidered and ready to be turned into circles to applique to the window squares:


I used Sulky Petites thread, which is equivalent to 2 strands of embroidery floss but without the tangled mess. I loved the way it stitched! Straight stitches, back stitches, and French knots were all it took, and I was able to do it in front of the TV which is always a plus in the evening.

All 25 labels are finished - now on to making them into circles! More soon...

Wednesday, October 19, 2016

Next Stop, Christmas!

Or more accurately, Advent. I have a really fun commission quilt to make next, an Advent calendar for a special little boy. His Mom wants it to be a wall quilt with pockets for treats, and I've been wanting to make something like this for a long time. Here's the design I came up with:


Working title - Christmas Condos! Mostly pieced, with a bit of applique. I like the numbers jumbled up in no particular order as it will keep the little guy searching for his treat each day.

And here's the fabric palette, so far. I'll need a few more reds and golds I think.


I can't wait to get started - more soon!

Thursday, October 13, 2016

Sky High Finale

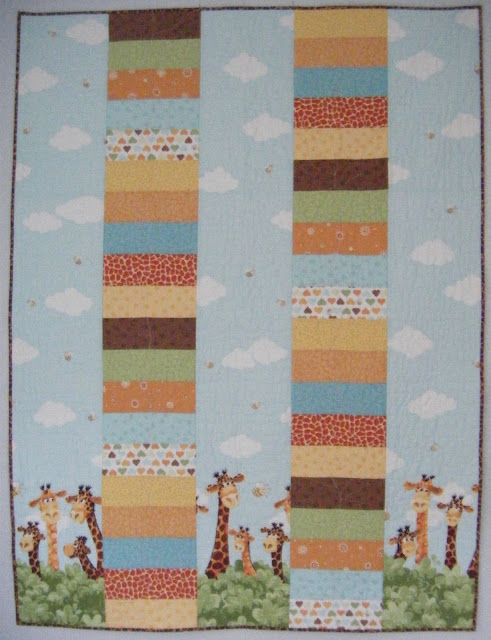
My Sky High quilt for Susybee/Hamil Textiles is finished! The machine quilting went really well, and I hand-stitched the binding down last night while watching TV. That's one of my favorite parts of making quilts - I love the contemplative nature of it. So, here it is!


The giraffe-print border fabric is SO adorable. Cutting it was actually the only slightly tricky part of making this quilt. You kind of need to lay out the entire piece of fabric and pre-plan where to cut strips featuring giraffe groups, and where to cut strips to use to add on as extra sky at the top of each giraffe strip. Like this:


But once those 9 1/2" wide strips are all cut, it's smooth sailing.

This quilt will be on display at International Quilt Market in Houston in the Hamil Group booth, #2641. If you love these fabrics and/or this quilt, let your quilt shop know and they can order yardage right there and then! The pattern will be FREE on the Susybee website here: http://www.worldofsusybee.com/patterns/free-patterns.html