Monday, November 14, 2016

Quiltmaker's 100 Block Blog Tour

Volume 14 of Quiltmaker's 100 Blocks magazine is now available and I have a block inside! I am thrilled to be in the company of so many awesome quilt designers, including Bonnie Hunter, Carolyn McCormick, Nancy Mahoney, Sarah Maxwell, and more. Here's the pretty cover:

Order a magazine online


My block is called Chicken Foot, and it's not an original, unlike the other 99 blocks in the magazine. It's a traditional block, but one that has fallen so far under the radar that it's nearly impossible to find a reference to it or pattern for it anywhere. It was also my Mom's absolute favorite quilt block of all time. She loved to piece it by hand and made several quilts using it, as well as many "orphan" blocks.

For the magazine, I resized the block to 12" finished size and made up a sample using 1930s repro prints. I loved the opportunity to showcase these cute novelty fabrics in such a sophisticated setting. Take a look:


I recently finished a quilt featuring some of Mom's Chicken Foot blocks for my niece's wedding. I made appliqued blocks for the alternate spaces. The name of this quilt is From This Day Forward and the pattern will be available in an issue of McCall's Quilting magazine sometime in 2017:


But Chicken Foot blocks don't just have to be pastel! How about glorious red, white, and blue?


As you can see, when you do a bit of planned fabric placement, instead of a completely scrappy look, you can get all kinds of secondary designs going, which I love. Another great feature of this block is the large open center, perfect for showcasing a bit of applique, embroidery, or fancy quilting.

The Chicken Foot block is a bit challenging to make, but its versatility, uniqueness, and striking geometric qualities make it well worth the effort. I hope you'll give it a try and send me a photo of your version!

Now for a magazine giveaway. Leave a comment below with an idea for how you'd make this block by midnight, November 18, and you'll get a chance to win a copy of Volume 14 of Quiltmaker's 100 Blocks. Good luck, everyone!


Monday, November 7, 2016

Advent Calendar Wall Hanging Ready to Quilt

I've been having quilty adventures left and right the last few weeks, starting back to work with McCall's Quilting and Fons & Porter to cover a maternity leave, finding a super-nice group of women to quilt with on Wednesday evenings (shout out to The Bee!), making Christmas crafts with my sister and cousins, and more.

But the main thing on my menu has been the Advent Calendar wall hanging, which got layered for quilting just yesterday!


I'm overall very pleased with it. Ideas for machine quilting are starting to solidify and I hope to get it on my worktable today or tomorrow. 

The little pockets for treats came out well. I made each pocket just a tiny bit wider than the patch behind it so it would be a bit gathered, allowing bigger treats without distorting the whole wall hanging. Bigger treats = happy kids!


One small problem came up right at the end. I must have been more tired than I knew on the evening when I fused the tree shapes etc. to the finished top, because the trunk for that tree on the right was WAY off center, too far to the left. Solution: Add a Christmas gift to the design and obscure the offending portion of the trunk. I think it works!


That photo was before the shapes were stitched down. The bow looks more like a bow now that it's stitched.

So, that's what's on my to-do list this week. How about you?  :)

Wednesday, October 26, 2016

Advent Calendar Quilt Beginnings

Yesterday I started working out the details of my new Advent calendar quilt. First problem - how to get the numbers onto each 3" square window in the quilt. I knew I wanted to make circles with numbers on them, in hopes of stitching them onto the windows with decorative machine stitches so they look a little like wreaths. But I hadn't really thought out how to get the numbers onto the fabric circles.

Time is of the essence, of course, so first I considered fabric marker. I tried a variety of pens out on a variety of fabrics, but didn't like anything I came up with. It just looked - cheap.

Next, I considered applique. But when I realized the numbers would need to be about 3/4" (tiny!) and that I'd need to do 41 digits total, I gave that idea up. Even with fusible applique, that seemed like a big task when you consider the edge stitching required to secure everything.

Finally, I thought about embroidery. While I don't do it often, I do enjoy the process. And it would give the project the handmade look I'm going for. So, here are some of the numbers embroidered and ready to be turned into circles to applique to the window squares:


I used Sulky Petites thread, which is equivalent to 2 strands of embroidery floss but without the tangled mess. I loved the way it stitched! Straight stitches, back stitches, and French knots were all it took, and I was able to do it in front of the TV which is always a plus in the evening.

All 25 labels are finished - now on to making them into circles! More soon...

Wednesday, October 19, 2016

Next Stop, Christmas!

Or more accurately, Advent. I have a really fun commission quilt to make next, an Advent calendar for a special little boy. His Mom wants it to be a wall quilt with pockets for treats, and I've been wanting to make something like this for a long time. Here's the design I came up with:


Working title - Christmas Condos! Mostly pieced, with a bit of applique. I like the numbers jumbled up in no particular order as it will keep the little guy searching for his treat each day.

And here's the fabric palette, so far. I'll need a few more reds and golds I think.


I can't wait to get started - more soon!

Thursday, October 13, 2016

Sky High Finale

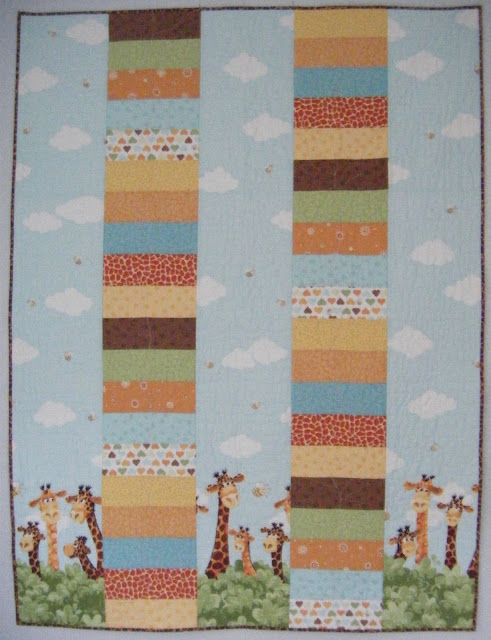
My Sky High quilt for Susybee/Hamil Textiles is finished! The machine quilting went really well, and I hand-stitched the binding down last night while watching TV. That's one of my favorite parts of making quilts - I love the contemplative nature of it. So, here it is!


The giraffe-print border fabric is SO adorable. Cutting it was actually the only slightly tricky part of making this quilt. You kind of need to lay out the entire piece of fabric and pre-plan where to cut strips featuring giraffe groups, and where to cut strips to use to add on as extra sky at the top of each giraffe strip. Like this:


But once those 9 1/2" wide strips are all cut, it's smooth sailing.

This quilt will be on display at International Quilt Market in Houston in the Hamil Group booth, #2641. If you love these fabrics and/or this quilt, let your quilt shop know and they can order yardage right there and then! The pattern will be FREE on the Susybee website here: http://www.worldofsusybee.com/patterns/free-patterns.html


Wednesday, October 12, 2016

Free Motion Quilting Fun

Today I was quilting my Susybee crib quilt destined for International Quilt Market, and I thought it might help someone out there to see how I give myself guidelines for free motion quilting without marking on my quilt tops. I will only make marks on a quilt top under extreme duress, that is, there's a design I really want to do and I can't figure out any other way to give myself the guides I need. In this case, I was able to avoid all marks on the quilt top, and here's one of the tricks I used.

Cutting simple shapes out of freezer paper, Steam-a-Seam 2, contact paper, or any light-to-medium sticky paper is a great way to get quilting guidelines temporarily onto your quilt top. Today I used leaf shapes cut from Steam-a-Seam 2. Freezer paper is good, but you have to use an iron to adhere it, and it doesn't have much hold, so I generally use that only for small quilts. Contact paper is stickier, and since this quilt is going to Market, I didn't want to chance any residue - the quilt won't be laundered before it's displayed. So - Steam-a-Seam 2 was the choice today. I started by cutting out a leaf shape from light card stock, and then traced it onto the SAS2 and cut out shapes. I think I cut out about 6 leaves total for this quilt; as you use them, the edges can get nicked by the needle or just generally ratty so it's nice to have a few for the project.

All you have to do is finger-press the shape onto the quilt top at the spot where you want a leaf (or whatever design you're stitching).


Machine quilt around the shape:


And then remove the paper shape.


In this case, I added a vein to each leaf without any markings or guides - freeform fun!


Then you can move the repositionable shape to the next area where you want a motif:


SO easy, and it gives me just enough guidance to get fairly uniform motifs.

Please leave a comment with any free motion quilting tips of your own. I'm always looking for new ideas!

Monday, October 10, 2016

Make New Friends...

Yesterday I got to visit the Catoctin Colorfest in Thurmont, Maryland, a HUGE arts and crafts festival now in its 53rd year. You know, the kind of event where you can't even park, you have to ride a shuttle bus there from an outlying parking lot. I went with my sister, my niece Lara, and her new husband Brian. Here we are right after eating a yummy street fair lunch of assorted bad-for-us foods.


As always happens to me at events like this, I went into it thinking how fun it would be to visit all the vendors that had anything to do with quilts and other textiles. And it was, it really was. There were some lovely quilts, table runners, fabric baskets, and more. But here's the booth that touched my heart the most:


That pretty pink and white quilt was being used as a tablecloth in a display of primitive wooden art pieces. It was in terrible condition, worn through in more places that not, with large areas of fabric missing entirely, but it was still so very sweet. I debated offering to buy it right out from under the display, but my pocketbook decided against it. Instead, I found myself having an imaginary conversation with the quilt.

"You are so beautiful! Look at all those perfect triangle units and that pretty hand quilting! And the soft pinks in your fabrics...just so sweet! I'm sorry you're feeling tattered and old."

"Don't feel sorry. I've already had a long and lovely life, and I'm not finished yet! Sometimes I miss the days when I covered my maker's bed and kept her warm as I was made to do, but now that I work at craft fairs I get to see more of the world, and to meet many people."

"Still, you must have suffered a lot of trauma over the years. Your fabric is so ripped up and tattered."

"That's not trauma, silly. That's love. My family loved me so much that they used me every night and laundered me often. I kept people warm and comforted sick children and even cuddled with a few family pets in my time. You can't be loved like that and not end up tattered. You've read the Velveteen Rabbit, right?"

"Good point, pretty pink quilt, good point. It's been lovely to meet you. Keep on keeping on."


The crowds were fun, the day was sunny and cool, and the leaves were just beginning to turn colors. A perfect outing with people I love. And I got to make a new friend - a pretty pink quilt I won't soon forget.

Friday, October 7, 2016

Quilt Market Preparations

International Quilt Market in Houston is just around the corner, so I have a rush job to work on the next few days. I'm so excited to be making a crib quilt using fabrics designed by Susybee! If you sew for children, you owe it to yourself to check out all the adorable fabrics available from Susannah Bleasby, a Canadian artist who has devoted a lot of time and creative energy to painting wonderful murals in the children's ward of a Toronto hospital. Operation: Art has given rise to adorable characters kids love, and now you can sew with them on lovely fabrics produced in association with Hamil Textiles of New York City.


But I digress. My particular quilt will feature Zoe the giraffe and friends. Here's a peek at some of their sweet faces:


And here's the fabric palette I'm working with:


I can't show you my quilt plan until it's presented to the public at Market, but it's designed to be modern and easy, and to really showcase that adorable border print. The working title of the pattern is Sky High. If you love these fabrics, let your local quilt shop know to be on the lookout for them in Houston. My quilt pattern will be available free from Hamil Textiles/The World of Susybee.

Now, time to quilt!

Wednesday, October 5, 2016

80 Is My New Favorite Number

Aurifil 80 weight thread, I love you. Your super-thin yet strong fibers have turned my only-average applique stitching into awesomely beautiful work. Normally, I use Aurifil 50 weight for applique, with no complaints, simply because it's easy to find. But my stitches are often visible, even when I REALLY pay attention and try to hide them. In my new project, I'm trying out Aurifil 80 weight, and....well, let me show you what I mean:


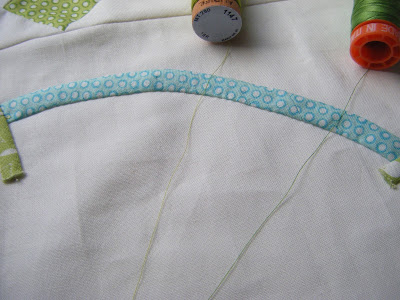
That's 80 weight on the left and 50 weight on the right. Sort of like spider web fiber versus rope! And here's what it looks like once stitched:


Try as I might, I can only see about 2 of the scores of stitches along the edges of these bias strips. This photo was taken from 2 inches away from the work, about the same distance that critical busybody at your quilting group will get to it during show and tell. What I'm trying to say is, 80 weight changes everything! Here's what to look for at your local quilt shop:


That's the 80 weight on the left. I'll still be buying 50 weight for piecing (Aurifil rules), but for applique, it's 80 weight all the way!


I'm a very fortunate quilter, as the Fat Quarter Shop sent me this 80 weight collection to try out. The spring green and all its little friends will be getting a workout on the Friends Sampler, for sure!


Tuesday, October 4, 2016

Friends Sampler Progress

My buddy Erin Russek and I are making progress on the sampler quilt we're designing together. So far, I've designed the piecing for the large center block, and now Erin has come up with the perfect applique design to complement it. Here's Erin's block so far:


She really is the Applique Queen, in my book!

Last night I added the appliqued basket handle to my pieced block, and this morning I positioned stems for stitching tonight:


I laid the block on a photocopied image of Erin's block to do this. When we get a pattern ready for the public we'll do a proper placement guide pattern, of course, because this was pretty hard to see through even my white background:


I taped the pattern sheet for the applique shapes to a window for tracing - that worked better:


I pretty quickly had all the shapes traced on the Mylar template plastic:


And then cut them out (with non-fabric scissors of course!):


I have a few rough places on the edges to smooth out, but an emery board will make short work of that. Then I'll be ready to start getting the appliques prepped. I use Erin's applique method for doing this, and you do all the hard work up front, turning under all the edges before glue-basting the shapes to the background. After that, it's all stitching fun! I'm looking forward to that stage!

Although Erin's method makes it possible for anyone to do beautiful work, I'm not quite the addict she is, so I'm thinking about ways to simplify her design for my quilt. The small circle shapes, for example, could be replaced with buttons. And I may reduce the total number of flowers. We'll see how it develops as I do my block.

So today I'm a happy appliquer! What are you working on?

Monday, October 3, 2016

More Orphan Blocks Adopted

This past weekend, the other side of my family held its annual reunion, complete with craft raffle. The pillows I made for the Labor Day reunion went over so well, I decided to pull out a couple more orphan blocks and make pillows for Sunday's gathering. I think they turned out great, and they were hot items at the raffle. A couple of my cousins' daughters won them, so I know they're going to good homes. Here they are!


It's funny - I don't even remember why I made the pinwheel block to begin with. But I do remember the flag block. It was featured in McCall's Quick Quilts June/July 2014 as a Block Builders Workshop. The pattern for the block appears in that magazine. There's also a free video on the McCall's Quilting website showing Erin Russek machine quilting a breeze design on the block. Check it out here!


Saturday, October 1, 2016

A New Spin On Drunkard's Path

*******Don't Miss The Contest At Bottom Of This Blog Post*******

Curved seams scare inexperienced quilters. There's something about NOT sewing in a straight line that's inherently frightening, and fear of curved seams keeps many quilters from expanding their design choices and making lots of fun, exciting quilts.

That's why I'm so happy to be part of John Kubiniec's blog tour featuring his new book for C&T Publishing, A New Spin On Drunkard's Path.


John's book has EXCELLENT illustrated instructions for making Drunkard's Path Blocks, which are based on the curved seam. It also includes many variations on the block, with limitless possibilities for quilt designs, plus 12 complete quilt patterns for those who prefer to follow tested instructions to making up their own patterns. All the instructions, i.e. text, diagrams, and photos, are clear, concise, and easy to understand.

John recommends using purchased acrylic templates for cutting Drunkard's Path patches, especially if you're making more than a couple of blocks. His favorite set, and the one used to make all the quilts in the book, is the Large Drunkard's Path Set by From Marti Michell. John sent me a set of these templates to try out, and I LOVE how they eliminate cutting concave (innie) curves, which is almost impossible with a rotary cutter. That's right - both the L-shaped patches and the pie-shaped patches for Drunkard's Path Blocks can be cut as convex (outie) curves, when you know the trick! For those of us who are spatially challenged (I totally flunk this part of every IQ test), the illustrations and diagrams in both John's book and the template set make this very clear and give you a real "aha!" moment!

Adding curved lines to your patchwork designs takes creativity to a whole new level. Whether you're interested in learning this technique to improve your own quilt designs, or in making awesome quilts from already-tested designs, you owe it to yourself to check out this book, now available in quilt shops and on John's website.

Our blog tour includes lots of photos of quilts from the book, sample blocks other bloggers have made, tips for using die cuts to create similar blocks, and so much more. Click through the following links to read it all, and to enter everywhere you go for a chance to win prizes!

September 26, 2016
Jennifer Dick   www.42quilts.com

September 27, 2016

September 28, 2016
 
September 29, 2016
Generation Q Magazine http://generationqmagazine.com

September 30, 2016

October 1, 2016
Kathy Patterson  http://hillstreetquilts.blogspot.com   YOU ARE HERE

October 2, 2016

October 3, 2016

October 4, 2016
Nicole Daksiewicz www.modernhandcraft.com/blog

October 5, 2016

October 6, 2016
Kim Niedzwiecki http://www.gogokim.com

October 7, 2016
John Kubiniec https://www.bigrigquilting.com/blog/

Now, how about a giveaway from Hill Street Quilts? Everyone is eligible to enter. C&T Publishing will send a free copy of A New Spin On Drunkard's Path to the winner (a hard copy will be sent to any domestic US winner while an electronic copy will be sent to the winner if outside the US). Additionally, John will send a Large Drunkard's Path Set of Marti Michell Templates to the giveaway winner. Two great prizes to one lucky winner!

To enter, leave a comment below by midnight October 7, 2016, making sure I can see your email address. Winner name will be drawn on October 8 and notified by email with subject line beginning YOU WON. Winner must claim prize within 24 hours, or a new name will be drawn, so watch your email. Best of luck to all who enter!

Sunday, September 25, 2016

Blog Tour Coming Up!


I first became aware of John Kubiniec's quilts when he entered a McCall's Quilting Quilt Design Star contest. Although he didn't take first place, his designs and workmanship were unique, stunning, and memorable. Over the years, we've worked together many times on his submissions to McCall's Quilting and McCall's Quick Quilts magazines, and we even got to spend time together in person this spring when he came to my home town to teach some quilting classes.


I was absolutely thrilled for him when he landed a book contract with C&T Publishing, taking his interest in Drunkard's Path quilt designs to new depths and heights. John's book A New Spin on Drunkard's Path is now widely available, and he's hosting a blog tour beginning tomorrow to get the word out! Hill Street Quilts will be one of the blog stops on October 1, and I'll be giving away a copy of the book and a set of acrylic templates by Marti Michell that are useful in making quilts from the book. Please check back on October 1 for a chance to win, and visit the following websites for additional chances to win great prizes. There are some great quilting blogs participating in this tour, so each day is sure to be fun and inspiring. Let's celebrate Drunkard's Path quilts!

September 26, 2016

Jennifer Dick   www.42quilts.com

September 27, 2016


September 28, 2016

 
September 29, 2016

Generation Q Magazine http://generationqmagazine.com

September 30, 2016


October 1, 2016

October 2, 2016


October 3, 2016


October 4, 2016
Nicole Daksiewicz www.modernhandcraft.com/blog

October 5, 2016

October 6, 2016

Kim Niedzwiecki http://www.gogokim.com

October 7, 2016

John Kubiniec https://www.bigrigquilting.com/blog/

Wednesday, September 7, 2016

Take A Class!

Did you notice the new logo at the top of the page? My friend and graphic design diva Ellie Brown created it for me from my rough drawing. I think it's just right for Hill Street Quilts - cheerful, bright, and very quilty!

I'm still working on the free motion quilting for my yoga mat, but I'm almost finished. I can't wait to get it bound and start using it in my practice sessions. 

The pillows I made for the craft raffle at my family Soup Party picnic on Labor Day found wonderful new homes. My niece Lara won the clamshell pillow, and my cousin Carolyn the sewing machine pillow. The soup was possibly the best ever! Here are my cousins Paul and Dave and my brother Rich gathered around the very large soup pot:


Yesterday I attended my first art class in about 30 years! I'll be learning a whole new style (for me) of watercolor painting, much more vivid and realistic than anything I've attempted before. Packing for an art class is a lot like packing for a quilting class - it's tough to imagine everything you'll need and get it into a single tote!


Here's what we did in Lesson 1:


No filters! All that drama was created with watercolors. My teacher, Debi Watson, did a quick fix on my background, but the rest is me. I think I'll enjoy this class!

If you're ever feeling creatively stuck in your quilting, consider a class in a different art. It wakes up your appreciation for color and form in new ways. And although I'm not currently considering a mushroom-themed quilt, you might also find new inspiration for quilt designs. Give it a try!

Sunday, September 4, 2016

Emergency Stitching Detour

So I started out my stitching time today with more free motion quilting on my yoga mat. I'm about 2/3 finished already! Then, as I'm happily quilting along, I remember...

Tomorrow is the Soup Party!

The Eck Soup Party is an annual family reunion (on my Mom's side) steeped in tradition and each year's enormous kettle of beef vegetable soup. If you're picturing a big pot of soup on a stove and thinking, "Wow, what a lame concept for a reunion", let me enlighten you. The original soup kettle for this every-Labor-Day event was a cast iron pot you could have cooked a missionary in, if you were a cannibal family, which we're not. My Mom was one of 14 children, 12 of whom survived to adulthood to procreate and require ever-increasing quantities of soup, so a huge kettle was a must. A few decades ago when my Grandpa Eck passed, the original soup pot was replaced by a somewhat lighter weight version one could still cook a good-sized child or two in (again, we are not so inclined).

There is no soup like soup party soup. It's rich and beefy and full of fresh-from-assorted-farms veggies. Several family members start prepping it at 7 AM so we can sit down to lunch at noon, when the cry of "Soup's on" is met by a stampede of Ecks young and old heading for the park pavillion. (Did I mention that we rent the park for the day? The whole park.) By the end of the party, the soup is even better. We (almost) fight over the leftovers, which go home with families and get carefully stowed in freezers for mid-winter soup party rituals involving lots of crackers and a bit of vinegar to refresh the flavors. I warned you there were traditions.

Carved wooden box by my uncle, Greg Eck

Another tradition of the Eck Soup Party is the arts and crafts raffle table. This is a class-A affair with nary a foam refrigerator magnet in sight. Among my relatives are many talented woodworkers (Grandpa Eck was a well-known local carver), painters, seamstresses, and all-around crafters. Heck, I have cousins who hand-craft the prize horseshoes for the horseshoe tournament each year! So the raffle table is a must-stop for everybody. And every year, I add my contribution, usually a small quilt or other fabric project.

But I forgot to plan something this year! So this morning when the realization hit me, I searched frantically around my sewing room for ideas. And I found some orphan quilt blocks. And I remembered that in my Mom's stash (still in my sun porch waiting to be disbursed from when we cleaned out her apartment in February) were some pretty nice pillow forms she had snagged on sale at Jo-Ann Fabrics. Problem solved!

I got to work sizing up one of the blocks by adding top and bottom strips, and then making an envelope back. Here's how that one turned out:


And then I decided to get fancy, because that's how I roll. I had an elaborate paper-pieced block I made when I did a review of Penny Layman's book, The Paper-Pieced Home, and it was exactly the right size for a 14" pillow form. But it needed something at the edges. Like...piping! But I didn't have any piping cord on hand. No problem...I'll use a triple strand of yarn! It actually worked out pretty well, and the pillow is so cute I'm tempted to keep it. But I won't. Because I want there to be many more Soup Parties in my future.


So, if you were an Eck, which of these pillows would get YOUR raffle tickets?

Saturday, September 3, 2016

Practice Makes Better

I've been working on the machine quilting for my double-sided yoga mat. I decided to quilt from the Kaffe Fassett side, on the theory that any oopsies on the back won't show as much on the taupe Bunny Hill fabrics as they would on the bright side.

Things started out very rough. It's probably two years since I did any completely free motion quilting, though at least I have machine quilted a few small pieces using marked patterns.

So, I started out just meandering, making swirls, and generally wandering around the quilt like a lost soul. My stitch length was varying widely as I got the feel for smooth hand movements. Not very pretty, but it was getting the job done.


Then, about a half hour into it, my hands remembered a fill design I'd had success with in the past. It starts with a center swirl, and then you add petals to the outside, like this:


Like 100% better! Now I'm happily quilting along and filling lots of open space rather quickly. My hand motions are smoother already too.

Practice really does make perfect! Or at least better...